

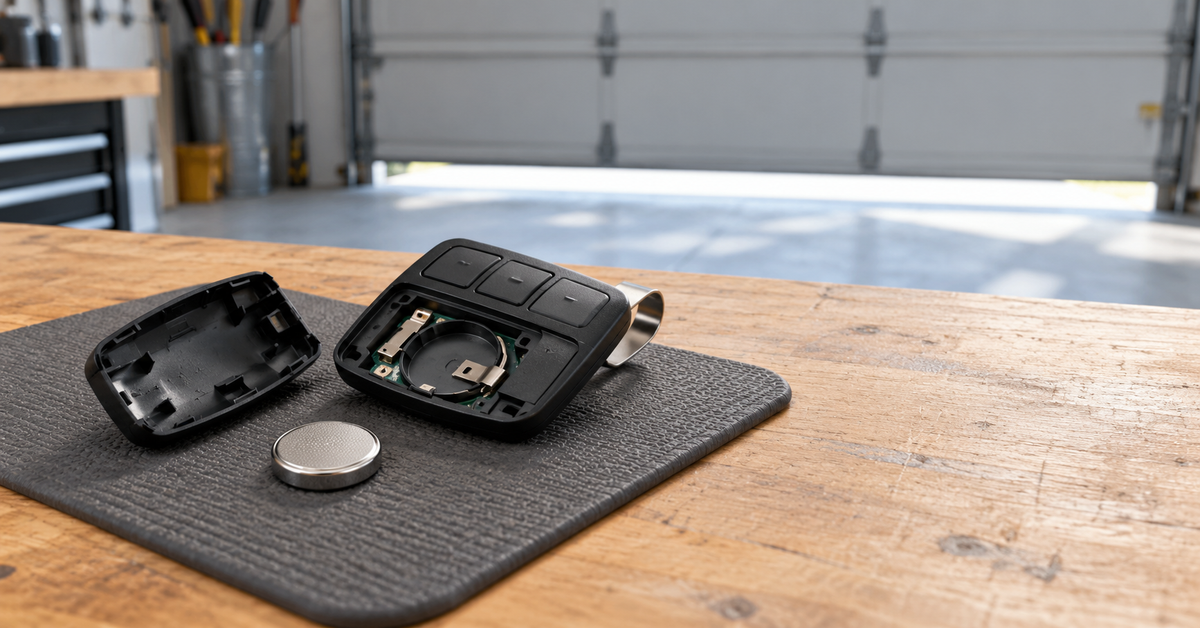
A garage door opener remote battery should be replaced with the exact battery code specified for that remote model. Many current visor-clip and keychain remotes use a 3-volt coin cell such as CR2032, but others use a different coin cell or a small cylindrical battery. Check the remote's model number, its manual, and the code printed on the old battery before buying a replacement.
This guide covers the battery inside the handheld or visor-clip remote. If you mean the larger backup battery inside the ceiling-mounted garage door opener, stop and check the opener's model-specific manual. That is a different battery system and a different replacement job.
How to Identify the Right Garage Door Opener Remote Battery
The safest shortcut is not a brand-only chart. A manufacturer can use several remote designs across different model years, and those designs may not share the same battery or opening method. Work from the exact remote in your hand.
- Find the remote model or part number. Check the back label, the area under the visor clip, or the inside of the battery cover.
- Look up the official instructions. Search the manufacturer's support site for that exact model or part number.
- Photograph the old battery before removal. Capture the complete code and which side faces up.
- Match every character. Do not substitute a similar-looking cell based only on diameter or voltage.
- Confirm the case-opening method. Some remotes slide open, some pry at a marked seam, and some have a small screw.
For example, the official Genie CR2032 replacement instructions show different opening steps for several Genie remote styles. A LiftMaster 8500W manual specifies a 3V CR2032 for the illustrated remote and shows its own case-opening method. These are useful examples, not universal specifications for every Genie or LiftMaster remote.
Common Garage Door Remote Battery Types
Garage door remotes can use coin cells or small cylindrical batteries. For example, Genie documents CR2032 remotes and also lists a 12-volt A23 replacement battery for certain garage door remotes. The exact requirement depends on the model, so treat the table as an identification aid rather than a compatibility chart.
| Battery format | What to check | Why visual matching is not enough |
|---|---|---|
| CR2032 coin cell | Confirm the full CR2032 code and required polarity | Other 20 mm coin cells can be thinner and may not maintain contact |
| Another specified coin cell | Match diameter, thickness, voltage, and complete code | A cell that looks similar can be the wrong thickness |
| A23 or another small cylindrical battery | Match the exact printed designation and orientation | It is physically and electrically different from a coin cell |
If your verified remote requires CR2032, see the BEVIGOR CR2032 product page. For other supported coin-cell sizes, browse the specialty battery collection. Product availability and device compatibility should still be confirmed at the time of purchase.
Garage Door Remote Battery vs. Opener Backup Battery
The phrase “garage door opener battery” can describe two different parts:
- Remote battery: A small cell inside the handheld, keychain, or visor-clip transmitter.
- Opener backup battery: A larger battery inside or attached to certain ceiling- or wall-mounted opener units so the door can operate during a power outage.
Do not use the instructions in this article to service an opener backup battery. Turn to the opener's manual and manufacturer-approved replacement part. If you are unsure which battery a search result describes, look at the location: a battery in the remote is the subject of this guide; a battery near the motor unit is not.
How to Change a Garage Door Remote Battery
The following sequence is a general workflow. Your remote's official instructions control the exact tools, opening points, battery code, and polarity.
1. Work in a clear, well-lit area
Keep children and pets away. Place the remote on a stable surface where a small battery cannot roll away. Have the verified replacement battery and any manufacturer-specified tool ready.
2. Record the remote model and current behavior
Before opening the case, note whether the remote has weak range, intermittent response, a dim indicator, or no response. That information helps if a new battery does not solve the problem.
3. Open the case using the official method
Remove a screw first if one is present. For a sliding cover, follow its arrow or release tab. For a snap-fit case, use only the seam or pry point shown in the manual. Stop if the housing bends sharply or does not release; forcing an unverified point can break the clips or damage the circuit board.
4. Photograph the old battery in place
Capture the printed code and polarity before lifting the cell. If the code is hidden, remove the battery carefully and photograph both sides. Do not assume that “3V” alone identifies the correct replacement.
5. Install the exact replacement
Match the complete battery code. Insert it in the orientation shown by the holder or official instructions, without bending the contacts. Do not stack cells or use foil, spacers, or another improvised method to make the wrong battery fit.
6. Close the case and test from a safe position
Reinstall any screw and make sure the case closes evenly. Test the remote while the garage door is fully visible and the doorway is clear. Start near the opener, then test from the normal operating distance.
Signs the Remote Battery May Be Weak
A battery is a reasonable first check when the remote:
- works only when you are close to the garage;
- responds intermittently or requires repeated button presses;
- has a dim or inconsistent indicator light;
- stops working while another remote or the wall control still works.
These signs do not prove that the battery is the cause. Radio interference, a damaged remote, dirty or bent battery contacts, loss of programming, or an opener problem can produce similar symptoms.
What If the Remote Still Does Not Work?
- Recheck the battery code and polarity. Remove the cell and compare it again with the manual and the old battery.
- Inspect the contacts without modifying them. Look for obvious dirt, corrosion, or a contact that was displaced during installation. Do not scrape, bend, or repair the circuit board unless the manufacturer instructs you to do so.
- Test another control. If the wall control and another remote work, the issue is more likely isolated to the remote.
- Check for interference. Follow the opener manufacturer's troubleshooting instructions for reduced radio range.
- Consult model-specific programming instructions. A battery change does not necessarily erase programming, but re-pairing requirements and troubleshooting steps vary. Do not press the opener's Learn button unless the official instructions tell you to.
If the case is cracked, the battery holder is loose, or the circuit board is damaged, replace the remote or seek qualified service rather than improvising a repair.
Coin-Cell Safety and Disposal
Coin cells are small enough to be swallowed and can cause severe internal injury. The U.S. Consumer Product Safety Commission advises keeping loose cells and devices with unsecured battery compartments away from children. If a coin cell might have been swallowed, seek emergency medical help immediately and follow current poison-control guidance.
As soon as a used coin cell is removed, keep it out of reach and cover its terminals with non-conductive tape. The U.S. Environmental Protection Agency says button-cell, coin, and single-use lithium batteries should not go into household trash or municipal recycling bins. Use a suitable battery collection program and follow local rules.
CR-series coin cells are primary, non-rechargeable batteries. Never attempt to recharge them. Store unused cells in their original packaging and away from metal objects.
Choosing a Replacement Without Guessing
The most reliable purchase decision follows three pieces of evidence: the exact remote model, the official manual, and the complete code printed on the old battery. When all three agree, you have a much stronger compatibility check than a broad brand list.
For more context on why similar-looking cells are not automatically interchangeable, read how lithium coin battery codes work. The BEVIGOR battery data sheet lists nominal specifications for supported sizes. If you are replacing a vehicle remote rather than a garage door remote, use the separate key fob battery guide.
Frequently Asked Questions
What battery does a garage door remote use?
It depends on the exact remote model. CR2032 is common in several documented remotes, but other coin cells and small cylindrical batteries are also used. Confirm the model, manual, and old battery code.
Are all garage door opener remote batteries CR2032?
No. Do not buy a CR2032 solely because it is common. The replacement must match the complete code and fit specified for your remote.
Will changing the battery erase the remote's programming?
Some manufacturers state that programming is retained for specific remotes, but that should not be treated as universal. Check the instructions for your remote before resetting or re-pairing it.
Why does my garage door remote have poor range after a new battery?
Possible causes include the wrong battery, reversed polarity, poor contact, a damaged remote, or radio interference. Confirm the installation first, then follow the opener manufacturer's range and interference troubleshooting steps.
Can I use a different 3V coin cell if it fits?
Not safely based on voltage alone. Coin cells with the same diameter can have different thicknesses and capacities, which can affect contact and fit. Use the exact specified code.
Is the opener's backup battery the same as the remote battery?
No. The remote uses a small replaceable cell. A compatible opener's backup system uses a larger, model-specific battery assembly. Follow the opener manual for that component.






Aktie:
How to Change a Key Fob Battery: Find the Right Size and Model-Specific Steps